Using Modifiers
Definition
A modifier in Mikan is an instruction defined on a helper node.
It is executed automatically after the rig is built and is used to customize and extend the rig's behavior.
Modifiers are the central tool that let you go as far as you want in customizing your rigs.
They act like “logic blocks” that can be stacked, combined, and adapted endlessly.
👉 These are the tools of your experimentation ground: you are free to combine them to enrich your rigs with tailored logic.
Key characteristics:
- A helper can contain any number of modifiers.
- Modifiers are executed in the order in which they appear.
- Combining multiple modifiers makes it possible to build complex, parameterized behaviors.
Typical use cases include:
- setting default values,
- adding constraints,
- creating visibility menus,
- setting up hierarchies and complex connections.
👉 The full list of available modifiers, with their definitions and usage, can be found here:
Mikan Documentation – Modifiers
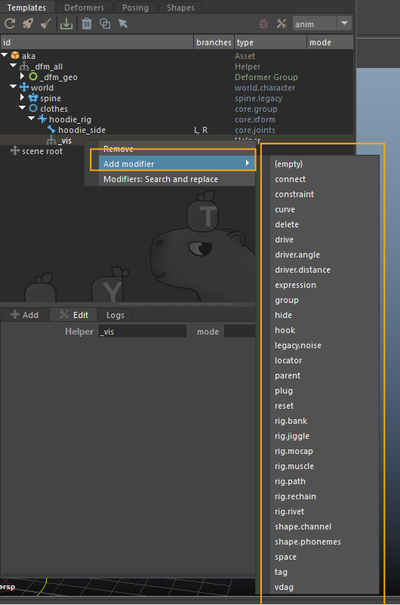
Adding a Helper and Modifiers
To define instructions with a modifier:
- Right-click on a template > Add Helper Node.
- Give the helper a clear name.
- Right-click on the helper > Add Modifier.
- Select the desired modifier type from the list.
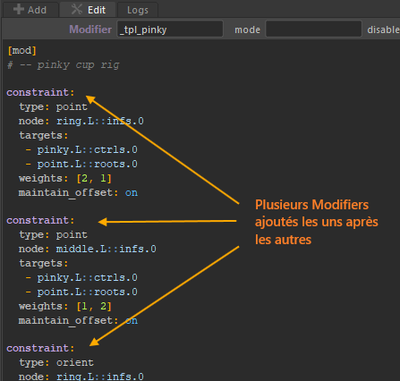
Each helper can contain multiple modifier notes, which are executed sequentially when the rig is built.
Example: hoodie rig with follow + manual offset
The goal is to rig a hoodie that:
- follows the clavicle's movement,
- while still giving animators manual control.
Main steps
- Create a group for the hoodie controllers and add a visibility menu.
- Attach the hoodie to the main rig.
- Add a custom follow attribute (follow_clav).
- Connect this attribute to the follow behavior using either a drive or an expression.
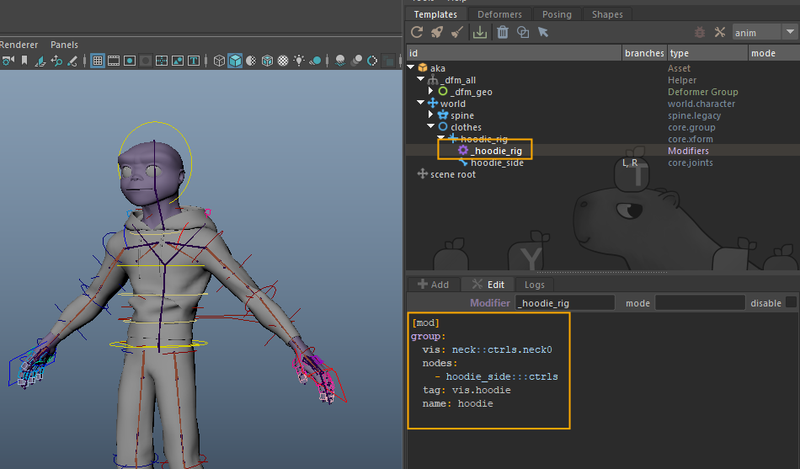
Step 1 : Group + visibility menu
First, create a template module group for the hoodie.
Then:
- Right-click on this module group > Add Helper Node.
- Give the helper a clear name (e.g. hoodie_rig).
- Right-click on the helper > Add Modifier > choose group from the list.
The group modifier creates a visibility menu that lets animators toggle the hoodie rig controllers on or off.
[mod]
group:
  vis: neck::ctrls.neck0     # the controller that will display the right-click visibility menu
  nodes:                     # the controllers that will be shown/hidden through this menu
    - hoodie_side:::ctrls
  tag: vis.hoodie
  name: hoodie
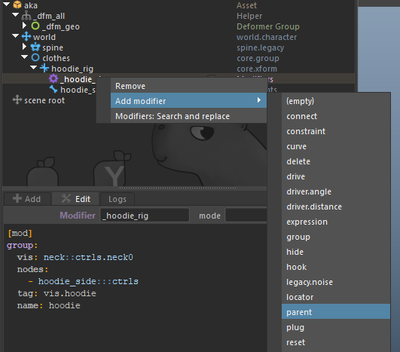
Step 2 : Attach the hoodie to the main rig
On the same helper, right-click > Add Modifier > Parent.
The parent modifier is added after the group modifier.
This modifier attaches the hoodie to the main rig.
[mod]
parent:
  - hoodie_rig::node
  - spine::skin.5
Step 3 : Add a follow attribute
To create the custom follow attribute, we need it to appear on both hoodie controllers: left L and right R.
For this, we add the note to a helper under the hoodie_side template module, which is already branched.
- Right-click on the hoodie_side joint module > Add Helper Node. Give the helper a clear name.
- On this helper, right-click > Add Modifier > Plug.
[mod]
plug:
  node: hoodie_side.L::ctrls.0
  follow_clav:
    type: float
    set: 1
    keyable: on
    min: 0
    max: 1
👉 This creates a slider to control how much the hoodie follows the clavicle.
Because the hoodie_side module has a branch [L, R], the note only needs to be written once for the left side.
Mikan will automatically duplicate the attribute for the right side.
Step 4 : Trigger follow with a Drive
On the same helper, right-click > Add Modifier > Drive.
This modifier creates a driven key so the hoodie follows the clavicle when it moves.
[mod]
drive:
  node: arm.L::j.clavicle@r.z
  hoodie_side.L::poses.0@t.x:
    -10: 0
    0: 0
    30: -0.2
    pre: constant
    post: constant
  hoodie_side.L::poses.0@t.y:
    -10: -0.2
    0: 0
    30: 1.25
    pre: constant
    post: constant
    flip: on
  hoodie_side.L::poses.0@t.z:
    -10: 0
    0: 0
    30: 0.21
    pre: constant
    post: constant
The drive is added after the plug modifier in the same helper.
It links the clavicle’s rotation to the hoodie’s pose, while still allowing manual control.
Step 5 : Connect the follow attribute
Edit the drive note to add a weight option.
This connects the drive to the custom attribute follow_clav.
[mod]
drive:
  node: arm.L::j.clavicle@r.z
  hoodie_side.L::poses.0@t.x:
    ...
  hoodie_side.L::poses.0@t.y:
    ...
  hoodie_side.L::poses.0@t.z:
    ...
  weight: hoodie_side.L::ctrls.0@follow_clav
👉 The drive now responds to the follow_clav slider.
This setup allows animators to control how strongly the hoodie follows the clavicle using the custom attribute.
Step 6 : Alternative with an Expression (recommended)
As an alternative, replace the drive with an expression modifier on the same helper.
Expressions are usually preferred because they are lighter and more flexible than drives.
[mod]
expression:
  op: y = lerp(0, flip*5*quat([rx, ry, rz], xyz).z, w)
  y: hoodie_side.L::poses.0@t.y
  rx: arm.L::j.clavicle@r.x
  ry: arm.L::j.clavicle@r.y
  rz: arm.L::j.clavicle@r.z
  w: hoodie_side.L::ctrls.0@follow_clav
With a single expression, both the clavicle follow and the connection to the custom attribute are handled.
This approach is recommended over a drive for clarity and performance.
Summary
Recap of the steps:
- Create a group for the hoodie + visibility menu,
- Attach the hoodie to the main rig with a parent modifier,
- Add a follow_clav attribute to the control,
- Implement the behavior with a drive or, preferably, an expression, connected to the follow attribute.
💡 Recommendation: prefer expression over drive — it is lighter, cleaner, and more responsive.
When modifier notes are placed under branches, Mikan automatically duplicates them.
You only need to write them once, on the left side — Mikan applies the same logic to the right side.
✅ No need to copy and paste.
Conclusion
Modifiers make it possible to automate and customize rigs directly in Mikan.
They allow you to:
- stack logic,
- parameterize behaviors,
- and enrich rigs in a consistent and maintainable way.