Shape Editor
The Shape Editor is a centralized tool within Mikan designed to manage collections of Set Driven Key (SDK) poses and blendshapes. It provides a unified pipeline to sculpt, edit, driven-key, and store pose setups directly into Mikan template modules.
All interface screenshots in this section refer to the sample scene available on Google Drive.
Key Concepts
To use the Shape Editor efficiently, you only need to understand two main components:
- Driver: A DAG node (preferably a dedicated Locator) that holds custom attributes. These attributes drive the shapes/poses (similar to Maya's native Set Driven Key driver).
- Group: The root template module (typically a
core.group) that encapsulates all the controllers and pose nodes you want to affect.
Technical Scene Setup
To enable automated pose recording and template persistence, your rig hierarchy must adhere to Mikan's structural conventions.
1. Driven Key Pose Nodes
The Shape Editor looks for paired pose and control nodes matching this naming scheme:
- Pose Node:
{tpl}::poses.{n} - Control Node:
{tpl}::ctrls.{n}
Do not create pose nodes manually. Enable the do_pose option on supported template modules (core.joints, core.bones, rig.spline, or digit.legacy).

2. Blendshape Ingestion Setup
- Internal Creation: Generated directly via Add Sculpt Target if base meshes exist in the scene.
- External Ingestion: When importing shape scenes from external packages, group target geometries under a transform group matching the exact Group ID passed to the interface field.
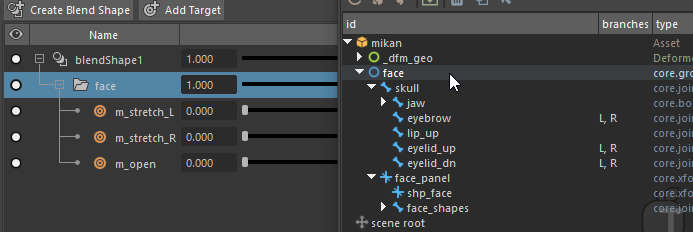
3. Driver Connections
The Driver node acts as an intermediary evaluation layer that routes, remaps, and distributes animation data across rig attributes. It standardizes how complex control values drive lower-level character deformations.
- Initial Setup & Core Role: Once the node is initialized, incoming control channels are bound to target attributes. The driver handles evaluation logic, range remapping, and blending before passing values down to the deformation graph.
- Multi-Target Mesh Grouping: A single driver channel can target identical shapes spread across multiple distinct meshes. This allows driving synchronized deformations (such as a mouth shape shared between a face mesh and a mustache mesh) from a single source attribute without duplicating control setups.
- Facial Rigs & Combination Logic: Driving logic, remap curves, and combination shapes (e.g., pose combinations) are handled upstream via specific modifiers like
shape.channel. - Pose Space Deformation (PSD): Connected via custom network nodes to evaluate pose combinations (dedicated PSD modifiers are planned for future releases).
Step-by-Step Guides
1. Creating Your First Driven Key Pose
- Initialize the Tools:
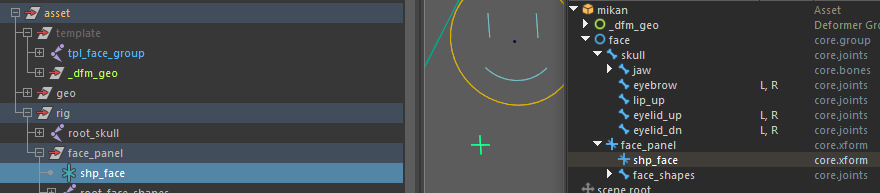
- Select your driver node (e.g., a locator) and click Driver.
- Keep your driver selected or select any control in your group hierarchy and click Group in the Selector Toolbar to auto-detect the parent
core.group.

- Add a Pose Attribute:
- In the Pose Editor panel, right-click inside the attribute list and select Add Shape (or use the input field).
- Enter a name for your attribute (e.g.,
mouth_corner_up_L).

- Pose Your Controllers:
- Manipulate the rig controllers in the viewport to create your desired pose.
- Record the Pose:
- Highlight your new attribute in the list and click Save. The controller transforms are now recorded onto the underlying pose nodes driven by this attribute value.
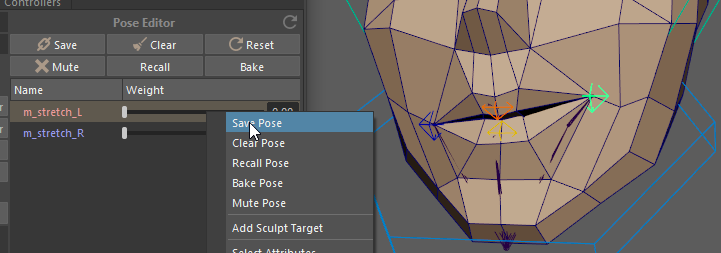
- Highlight your new attribute in the list and click Save. The controller transforms are now recorded onto the underlying pose nodes driven by this attribute value.
- Persist to Template:
- Click Save Mods in the top bar to record these driven keys into your Mikan template modifiers, ensuring they persist across rig rebuilds.
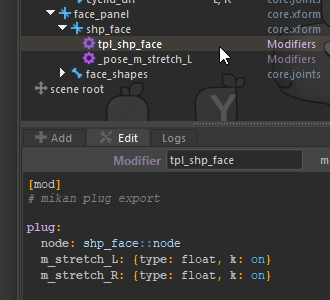
- Click Save Mods in the top bar to record these driven keys into your Mikan template modifiers, ensuring they persist across rig rebuilds.
2. Sculpting a Multi-Mesh Blendshape
The Shape Editor allows a single driver attribute to control blendshape targets across multiple geometries simultaneously.
-
Select Target Meshes: Select all base geometries in the viewport that should receive the sculpt.
-
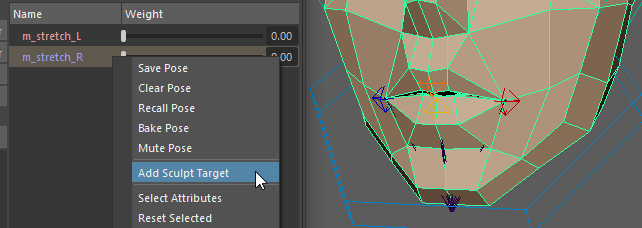
Add a Sculpt Target: Right-click the desired attribute in the Pose Editor list and select Add Sculpt Target.
-
Sculpt:
- Set your driver attribute value to
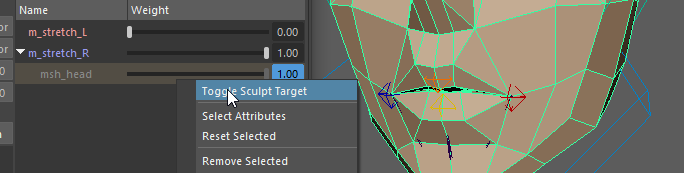
1.0. - Toggle Sculpt Target on the desired mesh in the list to sculpt adjustments directly on the geometry.
- Set your driver attribute value to
-
Validate: Dial your driver attribute between
0.0and1.0to verify the deformation across all connected meshes.
3. Fast L/R Pose Splitting with the Pose Shelf
- Create the Full Pose: Sculpt/pose both sides symmetrically on your rig.
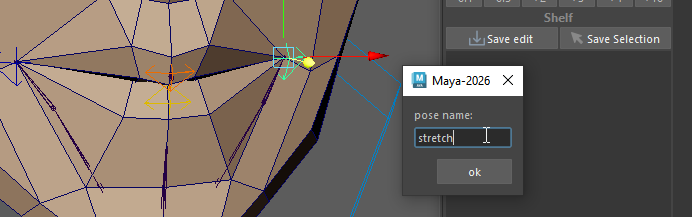
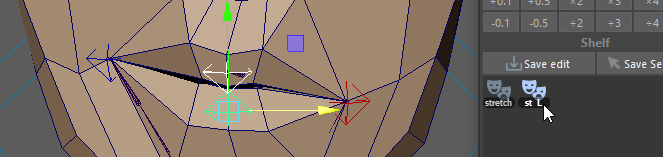
- Buffer in Shelf: In the Pose Shelf, click Save Edit to temporarily cache this full symmetrical pose as a button preset.
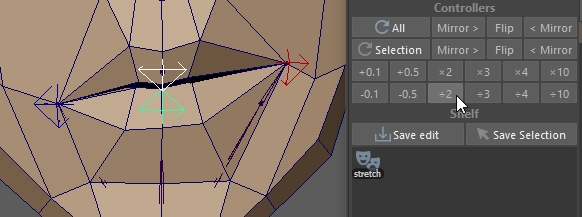
- Isolate One Side: Zero out or dampen the opposite side controllers using the SRT scale tools (
/2,Reset).
- Save Left Pose: Record this single-side pose onto your
_Ldriver attribute. - Flip & Save Right Pose: Click Flip in the Controllers panel to mirror the pose onto the opposite side, then save it onto your
_Rdriver attribute.
- Clean Up: Delete the temporary pose preset from your shelf once validated.
Interface Reference
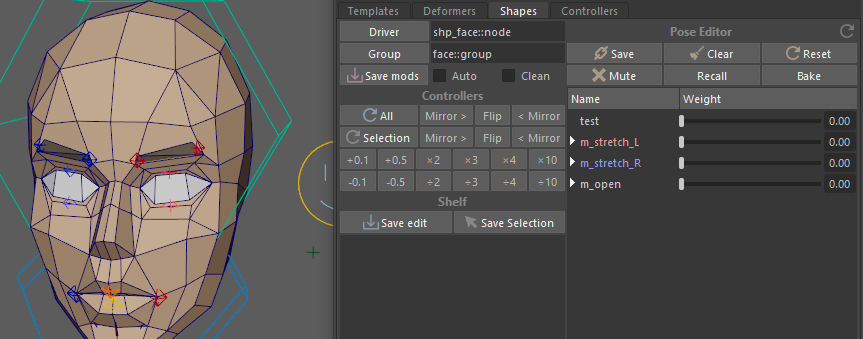
The Shape Editor window is divided into two main sections:
- Left Panel (Control Utilities & Pose Shelf): Selection sets, transform utilities (Reset/Mirror/Flip), SRT value scaling, and temporary pose storage.
- Right Panel (Driver Management & Pose Editor): Driver assignment, custom attribute creation, and saving/deleting shape poses.
Selector Toolbar
- Driver: Assigns the DAG node that hosts driving attributes for your shapes.
- Group: Assigns the active controller module set.
- Clicking Group climbs up the selection hierarchy to locate the root
core.groupmodule. - Troubleshooting: If this fails to populate, ensure the hierarchy contains controls linked to valid pose nodes.
- Manual Override: Right-click the Group field to choose a specific module manually from the dropdown list.
- Clicking Group climbs up the selection hierarchy to locate the root
- Save Mods:

- Save Mods: Bakes all driver attribute creation commands and scene driven keys directly into template modifiers.
- Auto Checkbox: Automatically updates template modifiers every time a pose is saved.
- Clean Checkbox: Purges driven keys associated with obsolete or deleted driver attributes.
Control Utilities
- Reset / Mirror / Flip: Clears or transfers transforms across all controls or active selections.

- SRT Scale Values: Multiplies or divides SRT values on selected controls. Ideal for dampening or amplifying influence during L/R splitting.

Pose Shelf (Iteration Buffer)
Acts as a temporary preset shelf for storing intermediate poses during sculpting and testing sessions.

Actions:
- Save Edit: Caches current transforms for all controllers within the active group.
- Save Selection: Caches transforms and custom attributes for selected controls only.
Right-clicking any saved pose button opens its context menu:
- Delete: Removes the selected preset.
- Clear: Clears all items from the shelf.
- Clear Poses: Removes all Save Edit entries.
- Clear Selections: Removes all Save Selection entries.
- Import / Export: Loads or saves shelf items to an external JSON configuration file.
Pose Editor
Manages all shape attributes connected to the assigned Driver node. Once both Driver and Group fields are set, the attribute list populates automatically.
Existing blendshapes properly organized in matching scene target groups are loaded and connected via driven keys automatically.
Main Action Bar

- Save: Records controller transforms onto the selected pose attribute.
- Clear: Removes driven keys associated with the selected attribute.
- Reset: Zeroes out all attribute values on the driver node.
- Mute: Temporarily disables pose node transforms for selected attributes (useful for sculpting a shape at 50% weight without interference from existing pose data).
- Recall: Re-applies pose node transforms back onto controllers for further editing (overrides current controller transforms).
- Bake: Bakes combined pose node deformations and controller transforms directly onto the controllers.
Attribute List Context Menu
Right-clicking empty space in the list:
- Add Shape: Creates a new shape attribute on the driver.
- Reset All: Resets all driver attributes to default (
0.0).
Right-clicking an existing attribute entry:
- Save Pose / Clear Pose / Recall Pose / Bake Pose / Mute Pose: Executes the action on the selected attribute.
- Add Sculpt Target: Generates and connects a new blendshape target on selected base meshes.
- Select Attributes: Selects attribute nodes in Maya and highlights them in the Outliner.
- Reset Selected: Resets selected attributes to default.
- Remove Selected: Deletes selected pose attributes.